Haptic Glove__More information

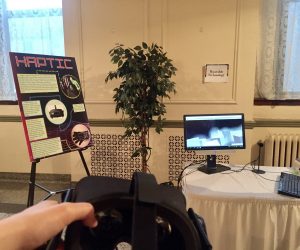
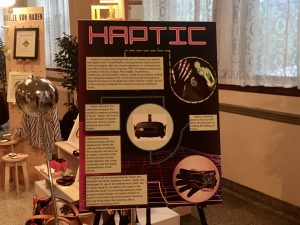
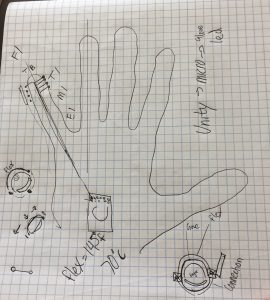
We designed a haptic glove which could generate the feeling of touching when users interact with the object in Virtual Reality. The haptic glove is made with an Arduino Uno microcontroller, conductive wires and rumble balls, which are well sewed and integrated with the glove. And we used Unity to create a Virtual Reality Game that puts users into the scene of the universe, allowing users to interact with the objects such as (Cube Planet, Sphere Planet, etc.) in it. For the virtual reality part, we used Oculus virtual reality goggles and Leap Motion to support our project. When users interact with the virtual reality, they could see their hands in the shape of robot hands in the virtual reality by the implementation of Leap Motion. And when the user touches the object in the virtual reality, the game will send a signal to the glove, and then the glove will run the rumble ball based on which finger the user is used to touch. In this way, the user could have a feeling of touching when they are in virtual reality. We see this as a way of linking the physic world with virtual reality world.

We are pleased about our project at the end, though it is our plan B. Our plan A is to use actuator memory wires to implement the glove. This kind of actuator memory wire is a new kind of materials. Our idea is that when the user touches the object in virtual reality, the wires will contract to generate a force to the touching finger. However, we tested the wires for two weeks with different voltages and shapes. As the performance of the wires was not stable enough to support our idea, we adjusted our plan and changed to use rumble balls. We tested the rumble ball with different frequencies and found the right one to generate the feeling of touching. When we presented in the fashion show, many users told us that it was really cool to have the actual feeling of touching in virtual reality.

If we could have more time, we would like to keep working on the idea of using the actuator memory wires. We would like to invite someone who is familiar with studying new materials to work with us. We want to try our best to provide better touching experience to the users.

Haptic

Haptic is a glove that allows the user to interact and explore the digital world. Virtual Reality, and augmented reality systems and technologies offer the unique experience on immersing the user into a world of their choosing. With VR systems being used currently in the Art, Design, Real-estate, Engineering, Healthcare, and Education sectors, it safe to say that the melting and interaction between the virtual and physical landscapes is desired and ready to be adapt into major markets. Haptic will aid in the interaction between the worlds by creating a feeling of touch.

Haptic will aid in the interaction between the worlds by creating a feeling of touch.  Haptic will do this by the activation of tactile response motors located along the bed of the fingers.

Haptic is the only glove to on the utility, focusing just on creating the feeling of touch.

Haptic will work by communicating with the digital world. When the user touches something the computer will send out a single to establish that there has been contact made between the virtual landscape and the digital representation of the gloves.

This signal will be interpreted by Haptic and activates the tactile response motors. Haptic was developed for use in the entertainment field. We at Haptic hope for our glove to be used in the healthcare sector to encourage persons under going physical therapy. And allow children to explore virtual learning environments, because the only thing better than learning about Dinosaurs is touching them.

GLOVE POSTER 1

Week 7-Haptic Glove

A Listing of accomplishments made by all group members for the previous week

  1. Created scenes in Unity and implemented Leap motion
  2. Got the glove
  3. Tried to work with Raspberry pi
  4. Poster

A description of problems encountered and outstanding issues

  1. Detect the collision between the Unity Object and hand
  2. Set up Raspberry pi


A plan for the next week of work

  1. Modify the collision function
  2. Connect Raspberry pi and Unity
  3. Implement the glove
  4. Get everything ready:)

Haptic Glove Beginning of the End

A Listing of accomplishments made by all group members for the previous week

  1. Learned about the leap motion and its implement in Unity
  2. Changed our plan to use rumble motors to guarantee the stability


A description of problems encountered and outstanding issues

  1. What kind of gloves should we use?
  2. How many microcontrollers should we use?
  3. Switching the Arduino code to python to get ready for the raspberry Pi http://playground.arduino.cc/interfacing/python


A plan for the next week of work

  1. Learn about the method and function to create the collision effect in Unity
  2. Implement the rumble motors on the gloves
  3. Finish the gloves housing and begin final calibrations to best create the haptic feedback.

Week 5 Haptic Glove Update

An image or video

Tested the new way of twining the actuator wires

A Listing of accomplishments made by all group members for the previous week

  1. Used conductive wires with actuator wires to provide stronger contracting effect
  2. Created a new way of constructing the wires to provide contracting feedback
  3. Used Arduino to control rumble motors on different frequencies (Plan B)

A description of problems encountered and outstanding issues

  1. Have some problems in the connection between Unity and Arduino (IOexception)
  2. The wire’s feedback was sometimes unpredictable

A plan for the next week of work

  1. Figure out the connection between Unity and Arduino
  2. Learn to implement the leap motion into Unity
  3. Try adding conductive covers on the actuator wires to ensure constant feedback
  4. Try to create scenes in Unity

Haptic Glove Update

Listing of accomplishments made by all group members for the previous week

  1. Got the LED to work with the Unity system
  2. Created prototypes of the wire housing and connection types.
  3. Considered different options to trigger haptic feedback, such as weaving the wire, or linking it.

A description of problems encountered and outstanding issues

  1. Conflicting results with SMA, possibly due to way the wire was spinned together, to many wires absorbing load, or power supply.
  2. Troubleshooting problems with activating the gravity mechanic in Unity, getting to know unity’s physical game engine,

A plan for the next week of work

  1. Sink or swim
  2. Abort memory wire if conflicting results persist, pursuing alternative haptic responses
  3. Finish with the Unity integration, and look towards integrating leap motion.
  4. Develop the housing and other concepts into integration of the glove.

Week 3 Post – Haptic Glove

An image or video

  1. Tried to use high temperature to shape the wires
  2. Tested the elasticity of the wires

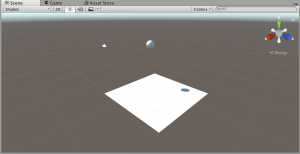
  3. Bouncing ball scene in Unity
     A Listing of accomplishments made by all group members for the previous week

    1. Figured out how the wire worked and how to shape it
    2. Ordered new wires with better elasticity
    3. Created the bouncing ball scene in Unity

A description of problems encountered and outstanding issues

  1. Figure out what kind of glove do we need. (Thin, Good malleability, Thermal insulation)
  2. Still try to find a way to shape the wires
  3. Combine different functions in Unity to work together
  4. Figure out the best way to braid or twist the wire together to simulate the simulated effect.

A plan for the next week of work

  1. Test the new wire. If it works, we will implement it our gloves. If it does not work, we will go to our backup plan.
  2. Keep working on Unity
  3. Figure the best way to attach the wires to the glove without risk of superheating materials at the wire/SMA point of contact.
  4. Figure the best type of elastic band to use that will compliment the design as well as not melt to the connection.
  5. Start to consider aesthetics of the final product.  

Week 2 Post – Haptic Glove

  1. An image or video 
    Tested the wires.

    Connect Unity to Arduino (Unity part) [Using touching the item in Unity to turn on and off LED as an example]
    Read data from Unity (Arduino part) [Using touching the item in Unity to turn on and off LED as an example]
  2. A Listing of accomplishments made by all group members for the previous week
    1. Received the actuator wires and tested on them
    2. Used heat tape to prevent heat from transforming to fingers
    3. Learned about how to implement wires on gloves
    4. Connected Unity to Arduino
  3. A description of problems encountered and outstanding issues
    1. We had some conflicting test results. Still not aware if the problem lay in the wire, the gauge, or the microcontroller being used. Problems may or not be that the actuator wire is not set to form currently, the result would be a lackluster performance of the wire, possibly leading to faster degradation of the wire when activated. (Maybe we burn a wire.)
    2. There is more refined technical information on how to use the Actuator wire, considering the length, gauge, and power supply that we need to sort through and apply. Currently, we are in the trial and error stage of material and component testing:
      1. -Wires need a standardized system of shaping for memory setting
      2. -Need to figure out a “tender” was to set the memory of the wire without superheating it and burning the wire.
      3. -Controller communication in relation to power output still needs to be established and regulated.
        1. Needed current: 0.2 A; Arduino voltage: 5V
        2. Calculated needed resistance: 25 ohms
        3. Wires’ resistance: 126 ohms/ meter ⇒ 1.26 ohms/centimeter
        4. So we still need 25-1.26x ohms(set x as the length of the wire) to guarantee 0.2A current
  4. A plan for the next week of work
    1. By next week we will have determined if materials need to be re-evaluated for the practicality, or usability. Reorder any parts or new parts, create an experimental prototype that will hopefully be a functioning prototype.
    2. Keep working on Unity.

Week 1 Post – Haptic Glove

  1. An image or video A draft that demonstrates how we want different components such as wires, microcontrollers, 3D-material holders to be built on the glove.Based on the data read from serial to change the LED light to be on or off. This can be applied to reading data from Unity and turn the wires on or off on the glove.
  2. A Listing of accomplishments made by all group members for the previous week
    1. Figured out how to use Arduino and Lilypad to read specific data from serials
    2. Contacted the wire company and ordered the wires
    3. Bought gloves and heat resistant tape
  3. A description of problems encountered and outstanding issues
    1. Still learning about Unity and how to connect Unity with Arduino
    2. Need to learn about sewing and how to integrate those wires and microcontrollers to the glove
    3. Delayed Shipping of Flexinol Wire
  4. A plan for the next week of work
    1. The most important material — wires will arrive tomorrow. So the task for next week will be testing the wires.
    2. Connect Unity with Arduino

Haptic Glove First Project Post

Project Title

Haptic Glove

Project Team Members

Kevin, Qiuxuan

Project Description

We hope to create a glove that can be used to interact with objects in virtual reality. Most of the virtual reality products now are focusing on visual experiences, such as “VR Goggle”. However, it loses touch sensations, such as the feeling of gravity and interaction force. Touch sensation plays a significant role in maximizing people’s experience. Therefore, we want to create a VR glove that uses special wires which are sensitive to temperature change (contract 3%-5% when exposed to heat or electrical current) to mimic the feeling of touching and pressure, to provide more realistic and engaging experience to users.

Sketches/Concept Art


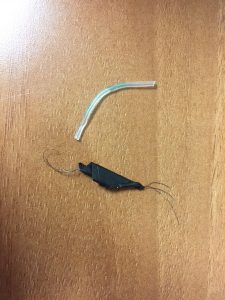
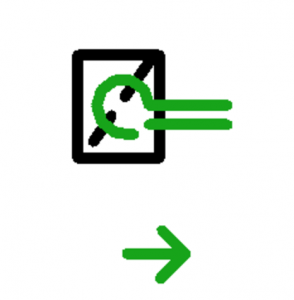
Connection\mounting type will be a looped conventional wire, or perforated actuator ribbon. Electrical connection will run in the gloves hemming for aesthetics and practicality.

Securing the Actuator wire is the most critical step currently. The force that the wire generates, varying between gauge, may burst the mounting, may stretch the underlying fabric so that there is not haptic feedback. Maintaining a fixed location on the glove to engage a haptic response may require 3D printed “splints,” to counteract the lateral forces generated. Elastic tension may be required to run along the nail side of the finger to give the additional guarantee of proper response.

Consideration on mounting site must account for the ~5% contraction, so that tread does not break upon Actuator activation.

We will use Unity to develop the programming and connect the microcontrollers with gloves, letting the sensors to communicate with the computer.

Materials and Costs

  1. FLEXINOL® Actuator Wire   estimated cost: $10-20
  2. Microcontrollers and USB    estimated cost: $40
  3. Glove                                      estimated cost: $10
  4. Wires                                      estimated cost: $10
  5. 3D-Printing Materials            estimated cost: $20

Timeline

March 6: Have all necessary materials.

March 12: Finish (3D printing model) and wire design.

March 15: Test

Milestone 1 (March 16): The technology for the project is shown to work

Spring Break

March 30: Programming and combine it with the glove

April 5: Test on program

Milestone 2 (April 6): The technology has been shown to work in a wearable configuration

April 13: Prepare for demo

Milestone 3 (April 20): The technology and final wearable are fully integrated

Fallback Plans

Ideally, we hope to use FLEXINOL® Actuator wires to provide haptic feedback. However, if it is not applicable, we can use other wires and shape into alternate forms to provide better feedback. Or we can use the wire to pull a spring/coil or elastic band to provide feedback. Or we can use tiny rumble motors or electrodes.