Heels Up! – Looking Back

Final Project

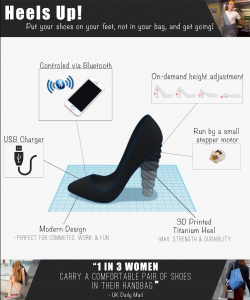
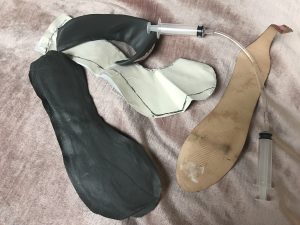
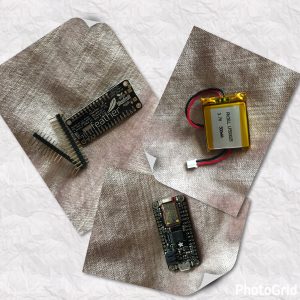
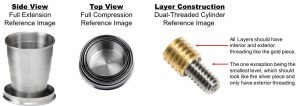
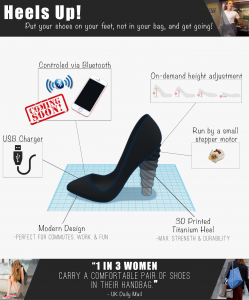
  • How it works: In its final form, the heel requires manual manipulation to adjust the height. In theory, an internal stepper motor will be attached to the heel via a spring. The rotation of the motor will enable the heel to expand and contract when activated by the Bluetooth sensor on the Adafruit board.

Final Poster

Describe how well did your project meet your original project description and goals.

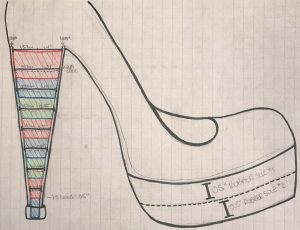
  • Goal #1: Adjustable Heel
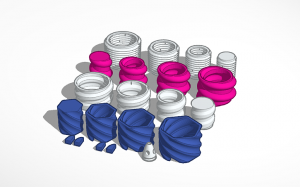
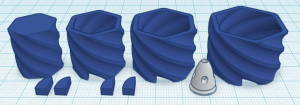
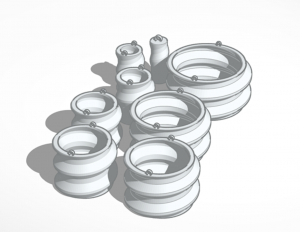
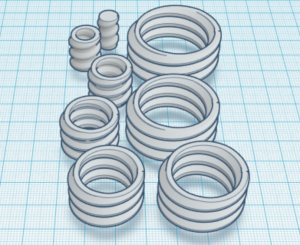
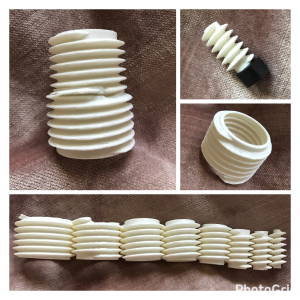
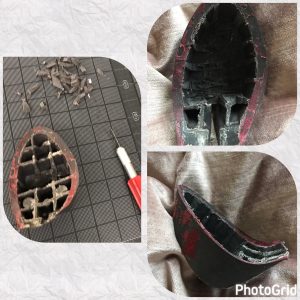
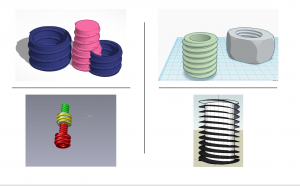
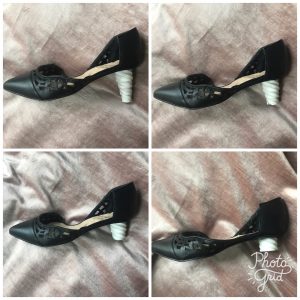
    • I was able to design the heel components very similarly to how I originally planned. One pivot is that I initially wanted the heel to be covered, but I ended up liking the look of the exposed pieces better.
  • Goal #2: Electronic Movement
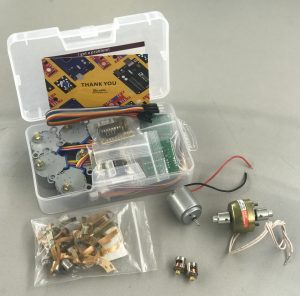
    • I was able to work with Kevin to program the stepper motor to move the internal spring. However, in order to have the needed length, I had to solder two springs together and during the final testing of the movement the solder broke.
  • Goal #3: Operated by Bluetooth
    • This was one aspect of the project that I was not able to get to due to timing.

Describe the largest hurdles you encountered.  How did you overcome these challenges?

  • When I originally came up with the idea for this project, I think that I underestimated the degree to which the unknown elements would hinder my success. For example, in my head I was planning on purchasing the outer shell of the heel. Then when it became clear that the pieces did not exist in the form I needed them, I decided I would just make CADs and 3D print them, but I did not fully understand how hard that would be. I think that this portion of the project was by far the largest hurdle that I encountered and sheer persistence and crowd sourcing solutions from my classmates helped me to overcome these issues.

Describe what would you do next if you had more time

  • If I had more time I would have liked to make the movement work and be operated by the Adafruit Bluetooth board that I purchased. As I was able to finalize the heel pieces by the end of the project, I was approaching this stage as the semester came to an end, so I do not think that that would have been an unrealistic goal. I think that having more time would have allowed me to purchase a longer spring, rather than having to solder two smaller ones together and just experiment more with the actual functionality.

Heels Up!

  • Naming
    •  Houston we have liftoff! Inspired by the aviation phrase, “wheels up”, that signifies that a plane has taken off, “Heels Up” is meant to evoke that with this product women are ready to “take off” on whatever adventures the day holds. Young professional women often travel frequently both for work and for pleasure, so they will be familiar with the term, and that duality also plays nicely into the fact that the shoe can be for either work or pleasure.
  • Heel Components
    • The final heel components seem to be working, the next step here is adding one of the many motors that I purchased (with Kevin’s help please).

  • Shoe Body
    • Once we are “Heels Up”, the shoe body will be specially constructed to fit the heel. If we don’t have a working heel prototype by Thursday, the shoe body will be constructed anyways.

One Last Shot at CAD

  • Last week
    • I designed several more iterations of the heel components using various TinkerCAD shape generators. I came into a few issues with the fact that I was using generators made by the TinkerCAD community, so when I would try and modify the designs, I would encounter glitches in the design. I was finally able to get a few versions that I feel good about and  sent them to the printing department on Saturday, but they will not be ready until tomorrow. All of the designs involve a tapered shape so that when a layer is extended downwards, it cannot fit through the bottom of the layer outside of it.

    • Additionally, with one of the designs I tried to design a stop to catch the layer when it is wound back up.

  • This week
    • Work on motor functionality and put the final shoe together.

Shoe Construction

  • Last week
    • I started putting together the shoe pieces I already had so that I can build the base for the prototype.

    • I also redesigned the heel components so that they do not have to complete 2 full rotations to extend their full length; I increased the height so that they will be able to condense/ extend from 0.75”-4”; and I added loops on top so that we can test if springs will be able to attach and  facilitate rotation.

  • This week
    • I plan on finishing the shoe base and testing the new heel components.

Back to the Drawing Board

  • Last week
    • After meeting with Rich in the printing room, I got re-inspired to work on my original design. I completed drawing the second version of the heel components and sent them to be printed. I’m glad that I know that there is a very affordable way to print the pieces, but the delivery timing is a bit unpredictable.
  • This week
    • I am going to attempt to construct a hybrid of my two designs and a suggestion that Kevin (student) had that would allow me to use a hydraulic movement rather than the rotary motor.

Changing Tides

  • Last week
    • Looked for parts at American Science and Surplus and found several types of motors and a hydraulic lift kit. After some contemplation and a realistic look at the time remaining to complete this project, I think I am going to pivot to my back-up plan and make and adjustable wedge instead of a heel. This will involve using a hydraulic scissor lift, which is much easier for me to understand than the rotary motor.
  • This week
    • Build scissor lift and shoe frame.
    • Work on understanding the Bluefruit component.

Step by Step

  • Last week
    • Heel Components
      • The 1st version of the 3D prints for the heel component arrived. However, they did not fit in each other, so I tried modifying the physical components with a jewelry file to see if I could get them to fit. This caused the threads on the largest of the rings to snap.
    • Platform work
      • I hollowed out the pre-existing platform of a heel that I own so that it can be used in the shoe until a custom platform has been fabricated. 
  • This week
    • Heel Components
      • I will continue to modify the 3D components and order the second version of the design.
    • Bluefruit
      • I will start to experiment with the Bluefruit components to see if I can get the device to work.
  • Next week
    • Heel Components
      • If the second version of the components function properly, I will order the final version in metal. Otherwise, I will continue to iterate and order new versions.
    • Motor
      • While in Milwaukee, I will go to American Science and Surplus to see if they have recommendations on small motors for the shoe.
    • Bluefruit
      • Once I have the motor, I will begin experimenting with the Bluefruit board to see if I can get it to spin the motor in two directions.

Computer Aided Disappointment (CAD)

  • Last week
    • I have successfully built many CADs and worked with others to design images for the heel components. Unfortunately, none of them are correct or complete. Things I have done to improve my skills on the software include completing many of the TinkerCAD tutorials, as well as watching many YouTube videos on SketchUp. I find that bouncing between platforms has helped me to learn them faster, yet I am still not great at either. I have also recruited help, but unfortunately the images are still not what they need to be.
  • This week
    • Tuesday: Continue working on 3D modeling
    • Thursday: Begin working with Adafruit Bluetooth component

Adjustable Shoe – Blog Post #1

Project Title: Adjustable Shoe

Project Team: Rachel Stern

Project Description:

  • Professional wear shoe that has a heel that changes height. The user can adjust the heel at 0.5” increments from a flat shoe (0.75” heel and 0.5” platform) to a high heel (4” heel and 1” platform).

Sketches/Concept Art

Materials and Costs

  • Heel
    • Concentric funnels
      • Original Prototype: 3D Printed Plastic: $2.50/part + $0.49/material cm3
      • Once the design is finalized, parts will be reordered, likely in titanium; decision pending final cm3 as this will determine overall cost.
    • Dual-Direction Rotator and Motor: TBD based on final material selection.
  • Platform
    • Rubber sole
      • 3D Printed Plastic: $2.50/part + $0.49/material cm3
    • Rechargeable (via USB) battery
      • Lithium Ion Polymer Battery – 3.7v 500mAh – $7.95
    • Bluetooth receiver
      • Adafruit Feather 32u4 Bluefruit LE – $29.95
      • Feather Stacking Headers – 12-pin and 16-pin female headers – $1.25
    • Shoe Shell
      • The portion will be created with found parts and fabric that I own. The approximate cost of these items was $20.


Timeline (*short timing to allow for extra time to be added in weeks that require it)

  • w/o 2/27: Finish CADs for concentric dual-sided threaded rings and order 3D prints.
  • w/o 3/6: Determine proper motor and rotation mechanisms to operate heel movement; order and test parts.
  • w/o 3/13: Build platform elements and test functionality: battery and charging housing in upper platform and movement track for lower platform.
  • w/o 3/20: Build shoe skeleton using heel and platform prototypes and found materials.
  • w/o 3/27: Incorporate Bluetooth technology to operate heel movement.

Fallback Plans

  • Lower the overall height of the heel/ platform to reduce cost and possible structural issues.
  • Change heel to platform to resolve any design issues.