Aurora Final Blog Post


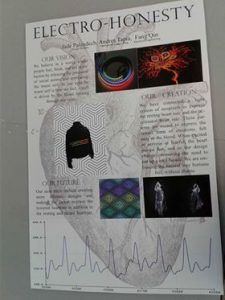
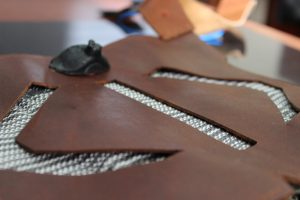
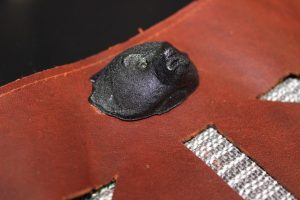
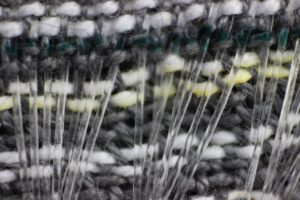
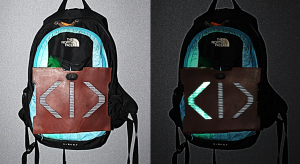
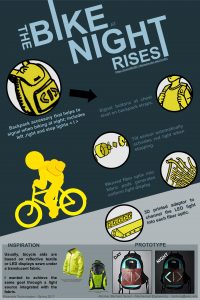
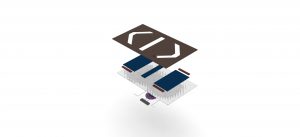
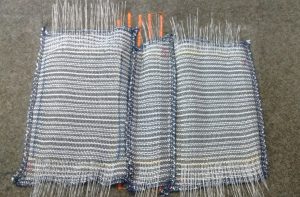
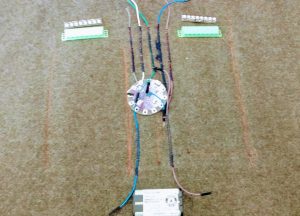
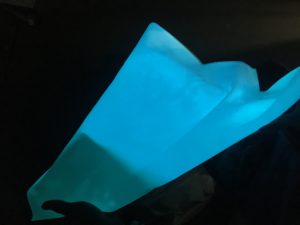
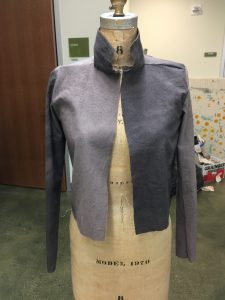
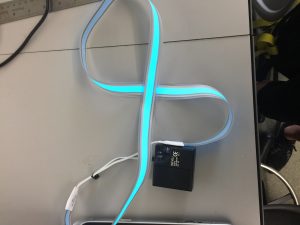
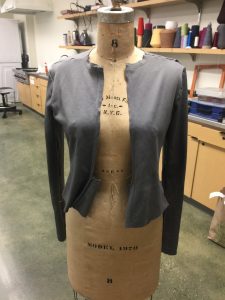
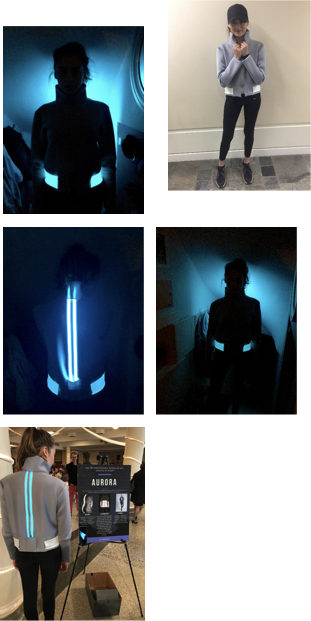
The Aurora Jacket is an athletic jacket made to be casual enough to wear during the day and sporty enough to wear on a jog at night. In darkness, the jacket contains safety features including a vinyl EL panel strip and engineered glow fabric. The 9V battery powered el panel can be controlled by the touch of a button. It flashes or it can stay on continuously. The glow fabric can charge from the sun’s natural light or artificial light, emitting the energy it absorbed in the dark, therefore creating the glowing effect.

I am very pleased with the outcome of my project. I just wish I had more time to do more to the design!

The Aurora jacket matches my original project end goals quite well. I originally knew I wanted to create the effect that reflective material gives but not just when light shines on it. I think my jacket can be very well seen at night. The only difference from my beginning plan is that it is missing the light sensor that would allow the automatic turning on of the lights when sensing low light conditions.

Finding the correct materials was a challenge. It took up a lot of time researching what materials I wanted to buy. Neoprene fabric is offered many places online but shipping was where I ran into problems. There is also apparently several different types of fabrics called neoprene because my first order was not the correct material! I had to call customer service the second time to make sure I was ordering the correct material and I had to buy expedited shipping. I found the glow fabric company on the library’s database and was lucky enough to get a rapid response though email from them. The vinyl EL panel strip I found last minute and came in the mail the final week the project was due…very risky, I don’t recommend relying on last minute shipping!

If I had more time…. I would have liked to work on the light sensor and get it working to the extent that it would automatically adjust the brightness of the lighting on the jacket according to your surroundings, similarly how our phones automatically adjust the screen brightness. I would have also liked to work more with the laser cutter and include the el paneling behind a really cool laser cut pattern. Note: the neoprene worked awesome with the laser cutter when I tested it. It’s very compatible and turns out really well.

Haptic Glove__More information

We designed a haptic glove which could generate the feeling of touching when users interact with the object in Virtual Reality. The haptic glove is made with an Arduino Uno microcontroller, conductive wires and rumble balls, which are well sewed and integrated with the glove. And we used Unity to create a Virtual Reality Game that puts users into the scene of the universe, allowing users to interact with the objects such as (Cube Planet, Sphere Planet, etc.) in it. For the virtual reality part, we used Oculus virtual reality goggles and Leap Motion to support our project. When users interact with the virtual reality, they could see their hands in the shape of robot hands in the virtual reality by the implementation of Leap Motion. And when the user touches the object in the virtual reality, the game will send a signal to the glove, and then the glove will run the rumble ball based on which finger the user is used to touch. In this way, the user could have a feeling of touching when they are in virtual reality. We see this as a way of linking the physic world with virtual reality world.

We are pleased about our project at the end, though it is our plan B. Our plan A is to use actuator memory wires to implement the glove. This kind of actuator memory wire is a new kind of materials. Our idea is that when the user touches the object in virtual reality, the wires will contract to generate a force to the touching finger. However, we tested the wires for two weeks with different voltages and shapes. As the performance of the wires was not stable enough to support our idea, we adjusted our plan and changed to use rumble balls. We tested the rumble ball with different frequencies and found the right one to generate the feeling of touching. When we presented in the fashion show, many users told us that it was really cool to have the actual feeling of touching in virtual reality.

If we could have more time, we would like to keep working on the idea of using the actuator memory wires. We would like to invite someone who is familiar with studying new materials to work with us. We want to try our best to provide better touching experience to the users.

Heels Up! – Looking Back

Final Project

  • How it works: In its final form, the heel requires manual manipulation to adjust the height. In theory, an internal stepper motor will be attached to the heel via a spring. The rotation of the motor will enable the heel to expand and contract when activated by the Bluetooth sensor on the Adafruit board.

Final Poster

Describe how well did your project meet your original project description and goals.

  • Goal #1: Adjustable Heel
    • I was able to design the heel components very similarly to how I originally planned. One pivot is that I initially wanted the heel to be covered, but I ended up liking the look of the exposed pieces better.
  • Goal #2: Electronic Movement
    • I was able to work with Kevin to program the stepper motor to move the internal spring. However, in order to have the needed length, I had to solder two springs together and during the final testing of the movement the solder broke.
  • Goal #3: Operated by Bluetooth
    • This was one aspect of the project that I was not able to get to due to timing.

Describe the largest hurdles you encountered.  How did you overcome these challenges?

  • When I originally came up with the idea for this project, I think that I underestimated the degree to which the unknown elements would hinder my success. For example, in my head I was planning on purchasing the outer shell of the heel. Then when it became clear that the pieces did not exist in the form I needed them, I decided I would just make CADs and 3D print them, but I did not fully understand how hard that would be. I think that this portion of the project was by far the largest hurdle that I encountered and sheer persistence and crowd sourcing solutions from my classmates helped me to overcome these issues.

Describe what would you do next if you had more time

  • If I had more time I would have liked to make the movement work and be operated by the Adafruit Bluetooth board that I purchased. As I was able to finalize the heel pieces by the end of the project, I was approaching this stage as the semester came to an end, so I do not think that that would have been an unrealistic goal. I think that having more time would have allowed me to purchase a longer spring, rather than having to solder two smaller ones together and just experiment more with the actual functionality.

Haptic

Haptic is a glove that allows the user to interact and explore the digital world. Virtual Reality, and augmented reality systems and technologies offer the unique experience on immersing the user into a world of their choosing. With VR systems being used currently in the Art, Design, Real-estate, Engineering, Healthcare, and Education sectors, it safe to say that the melting and interaction between the virtual and physical landscapes is desired and ready to be adapt into major markets. Haptic will aid in the interaction between the worlds by creating a feeling of touch.

Haptic will aid in the interaction between the worlds by creating a feeling of touch.  Haptic will do this by the activation of tactile response motors located along the bed of the fingers.

Haptic is the only glove to on the utility, focusing just on creating the feeling of touch.

Haptic will work by communicating with the digital world. When the user touches something the computer will send out a single to establish that there has been contact made between the virtual landscape and the digital representation of the gloves.

This signal will be interpreted by Haptic and activates the tactile response motors. Haptic was developed for use in the entertainment field. We at Haptic hope for our glove to be used in the healthcare sector to encourage persons under going physical therapy. And allow children to explore virtual learning environments, because the only thing better than learning about Dinosaurs is touching them.

GLOVE POSTER 1

Sirena – Final Post

Below is 3 pages of our final app design. First is the Home screen, then our Beacons page (Beacons are your selected contacts to message), lastly is the emergency page that will be shown after holding the button for 3 seconds.

Pictures of final cuff:

Poster Design:

Sirena is a fashion-forward cuff with the aim to prevent sexual assault by connecting women on college campuses with their social circles and local authorities. The idea behind Sirena is that if the wearer feels uncomfortable or unsafe, they would be able to press on the circular button on the top of the bracelet for 3 seconds and the bracelet would connect to the Sirena App on the phone and send a pre-set message saying you feel unsafe and also disclose your location.  The bracelet will vibrate once you send out the distress signal so you know that it got sent, and you would also feel a vibration in the bracelet when someone responds they are coming to help. However, since both Keegan and I don’t have much experience with coding and creating an app, the functionality isn’t fully functioning at this point. We still believe in the idea and would love for it to eventually work how we envisioned it to, but we have a ways to go before that can happen.

As a whole, I would say we are pretty pleased with what we were able to come up with in the time period that we had to work on it, but obviously would have wished to have it functioning even better.  We spent a good amount of time working on both the coding and design of the bracelet. The coding part, which Keegan worked on was very complicated and was what required most of the time and attention to so Keegan definitely spent more time on that than Emma did on the design of the bracelet as well as the poster. The design definitely didn’t meet Emma’s vision but that is mostly due to the limited resources we had with the technology needed.

Our original project goals were to be able to work together and have a fun and new learning experience working on something we both strongly believe in. When we look at it like that, I definitely think that we achieved those goals. However, we did hope for more function regarding our final project description and that was just too far out of our reach for now. We hope to continue to work on Sirena so we can eventually have it fully functional as to have the potential to not only help keep women safe, but also help the local police force have a better idea of where women feel most unsafe with our data and put up more street lights, promote SAFEwalk more, or station more officers in danger areas.

Some of the largest hurdles Keegan encountered had to do with the coding of the bracelet and connected phone application. Approaching something like creating an app without any previous experience was definitely an ambitious task, but in the end, what he was able to come up with is definitely something to be proud of. Emma had a couple of challenges with designing the bracelet itself. At first she wanted to sew it together with either leather or neoprene, but due to the hard and bulky technology, had to learn how to create a 3D model so it could be 3D printed. She originally started out making prints using TinkerCad, but moved on to sketchup and then ended up using NX for the final bracelet. After making a couple of prints using TinkerCad and sketchup, the prints were all separate and not the right size or fit so we moved on and Keegan was able to help her create the design using NX. The design after using NX was much better and Keegan was very instrumental in that process. The final design although was functional, could definitely use some adjustments. The button didn’t work seamlessly which was very frustrating. Also, for the future, Emma would like to have the technology engineered by possibly printing our own circuit boards to be much smaller so the bracelet could be more attractive and easier to manipulate for a more pleasing aesthetic and feel.

If we had more time, we would like to have been able to print another bracelet with tapered sides to improve the aesthetic and add some kind of design to the exterior of the bracelet. In terms of tech and functionality next steps would be to first get to send an email/text through the Simblee, this may not be possible and would require a different app development process to happen. Keegan worked with Ionic, an online app development site, for a couple weeks and found the content at a much higher level than his current coding knowledge, but Ionic did have far more applications than the Simblee mobile app alone. So, for long term growth and potential to bring Sirena to market the two of us would look to bring on someone with experience in app development to help improve our functionality.

Final Post- Electro-Honesty

Final Design:

The solid blue represents the heart in its resting rate and the rainbow pattern is designed for the elevated heart rate.

Final Poster:

Our project was designed to show the change in the wearer’s heart rate. We put a heart rate monitor into the cuff of the jacket that connected to three neopixel strips via a lilypad. We programed our lilypad to change the pattern of the neopixels based on a heart rate threshold of 82 beats per minute. The resting heart rate was designed to be a plain blue pattern and the elevated heart rate changes into a rainbow design. In addition we sew two layers of organza on a jacket, in order to attached the neopixel strips onto the jacket.

Overall, the team is proud of the work accomplished on this project. We started with a nearly identical design and we were able to see our concept through to completion. All team members learned from each other’s strength, from sewing to wiring to programming.

The largest hurdle faced was, surprisingly, soldering. One of our cables from the heart rate sensor was broken so we had to solder the cable back into the heart rate sensor it took a whole day to finished that.In addition, the neopixels had a very thin attachment point for the wires and the solder we had was far too large. This was a great difficulty but with time and effort it was overcome! Other issues we had were figuring out what light patterns would work best and how to attach the lights to the jacket. For the former, we simply discussed our options and settled on what we believe best represented our ideas. For the latter, we ended up using a tunnel system with two layers of organza. The first organza layer was stitched to the jacket bodice with two layers of stitching to keep the neopixels strips attached. The second layer was used to cover-up the stitching lines and it hung loose against the jacket bodice, attached only at the neck collar, bottom of the jacket, and the zipper.

If we had more time, we would like to expand our design options by adding a lowered heart rate design, also we would like to do a parallel circuit to make a pattern more complex.
We would use different materials for the heart rate sensor. There is a kind of textile which can be used as heart rate sensor, which will reduce lots of trouble for measurement and connections. That way, we would have three overall designs. We would also like to created more rows of neopixel strips or perhaps even another light form!
Finally, we would like to take data from our clients’ facebook profile and use it in the creation of the LED patterns, so based on the information collected, try to make patterns of emotions (calmness, excitement, etc ).

BIKE Final Post

1.  Some Pics

I use leather as the top layer, on it I carved the turning  and stop signals. trying to keep the shapes simple and clean.

The stop light is activated via sensor which I disguised inside Bucky’s head. Bucky’s head was 3D printed with a hollow center to host the sensor.

The turning signals were activated via pressure buttons located on the straps. Since the leather is thick and hard to press the buttons were initially cutout then attached to a thin rubber membrane, this way the lights could be activated without much effort.

I used an optic fiber weaved fabric as the medium to display the light.  For this I had to weave each optic fiber as well as channel it in to an LED.

This is a close up of the fibers embedded in the fabric.

This is the final result, the wearable is attached to the back of my backpack, and once turned on at night it has a very effective light dispersion. It will definitely serve its purpose.

2. The Poster


3. What does it do

BIKE is sort of a vest for your backpack; its has 3 independent light displays that help you signal when driving you bike at night.  The turning signs L-R are activated via wire and press button located at chest level in the straps of the backpack. The stop sign is activated via sensor embedded in bucky’s head.

It is composed of 3 layers:

a) the cover, in leather

b) the fiber optic

c) the electronics


4. What I think about the outcome

I think the purpose of BIKE is very straight forward, it has to light up when you tell it to , or when you stop on your bike. In that sense I’m pleased because it does what it’s supposed to. However I could have done a better job with the quality of the work; at the end the wiring and the assembly were not very clean.

5. Start vs. Finish

For starters I switched to my plan B at mid-semester, considering this my final prototype is very different to the goals I set to reach at the beginning of the semester.

In terms of the initial concept for BIKE, I initially though of it as a belt; but after some consideration I realized that a belt sized display wouldn’t have that much impact, and since I already had fiber optic pads with a certain size I decided to scale everything to fit them. The outcome is what you see in the pics.

6. Hurdles along the way

One of the most time consuming activities was the construction of the fiber optic pads. Concept wise it is very simple: the fibers need to be sanded a little so the light slips through and the tips have to be clean cut so the light enters without any restriction. But during the construction this prove to be quite cumbersome.

Another hurdle was the shipping of materials, and this was the main reason why I hat to switch to my plan B project. I could fine very cheap electronics in Amazon, but most of them come from China, and the leap time is more than one month (on average).

7. Whit more time…

I would purchased a new Lily-pad (my lily-pad broke down a couple days before the showcase) and I would have use the neopixels, in a more interactive way, maybe a blinking signal.

Final EoS Post

Final Form:

Final Poster:

Description:

EoS has a range finder on the right hand side that transmits it’s distance to the arduino in store, which in turn displays this data on a micro OLED screen. The OLED screen is reflected off a mirror and shows up on the lens in front of the user’s eye creating a heads up display. There is also a switch to turn it on and off along with a charging port in case the battery runs out of power.

Reaction:

Overall I was very happy with how the project turned out, it was fully functional and was also fairly accurate for the range finder not having a very good range. The only problem was some people were not able to see the numbers on the heads up display which might be an issue of people having different focal lengths.

The biggest hurdle I had to overcome was the original range finder not working properly so I had to pivot to a cheaper range finder that didn’t have anywhere near the same range. Other hurdles involved not having enough space in the 3D printed housing so I had to drill out more space, and I also had to drill a hole big enough to fit the charging cord in the back of the housing.

If I had more time I would definitely redo the housing so that it would properly fit all the components without me having to drill out some extra space. I also would spend more time trying to figure out how to use the original range finder so that I could have a range that is actually practical.

But in the end I was happy with what I accomplished and it met my expectations for my first engineered project.

Week 7-Haptic Glove

A Listing of accomplishments made by all group members for the previous week

  1. Created scenes in Unity and implemented Leap motion
  2. Got the glove
  3. Tried to work with Raspberry pi
  4. Poster

A description of problems encountered and outstanding issues

  1. Detect the collision between the Unity Object and hand
  2. Set up Raspberry pi


A plan for the next week of work

  1. Modify the collision function
  2. Connect Raspberry pi and Unity
  3. Implement the glove
  4. Get everything ready:)

Aurora Jacket 4/25

I have all of my materials now except for a zipper. Last Thursday I learned to sew a jacket together and did two prototype jackets. This weekend, I got all my final materials in the mail including the vynel el panel strip and my neoprene fabric is out for delivery (again) today. I had to sign and pay a postage fee in order for it to be delivered…

I have extra material that I will sew together today exactly like how I will want my final jacket to look. I need to practice how I will connect the sleeve cuffs and collar. I also need to set the el panel to the light sensor I have and get that up and running. I will make plans on how I’m exactly going to integrate the glow fabric and el panel in the final jacket. The battery pack I received in the mail makes a high pitched noise when I turn it on so I will need to troubleshoot that as well.

Aurora poster rough draft