Aurora Post #4

Over the weekend I designed a potential pattern that I will laser cut and hopefully successfully use on parts of the jacket. I had to purchase Adobe Cloud for $20/month.

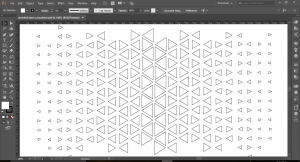
Let me know if you have any feedback on this pattern! My backup pattern would be a simple pattern of small circles.

My prototype jacket is fully seam-ripped. It is ready to trace but I ran into a problem with the fabric supplier I went with online. They are moving locations and I read in the email after I purchased some fabric samples that shipping may be delayed and they are moving through April 28th…So I have to call and see if they can meet my time sensitive request or if I have to quick order from another website.

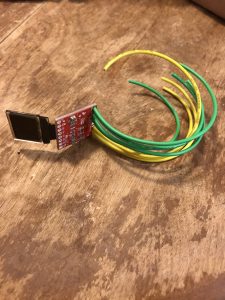
My main goal this week is to make a trip a Joanne’s Fabrics and order/purchase my neoprene fabric for the final product asap. I also am waiting to hear back from a supplier with a white EL strip product that I want to purchase. I too, am waiting to hear from Lunabrite if they have a sample piece of blue luna gel glow fabric I can get for my final product.

Muscle Jet Post#4

  1. I’m going with plan B: 

  1. I’ll still be using the FO fabric I’m making, which is half way done
  2. Buying multiple sensors became too expensive
  3. Cut the leather sow the components in to it, print adapter for the LED to FO fabric.

Haptic Glove Update

Listing of accomplishments made by all group members for the previous week

  1. Got the LED to work with the Unity system
  2. Created prototypes of the wire housing and connection types.
  3. Considered different options to trigger haptic feedback, such as weaving the wire, or linking it.

A description of problems encountered and outstanding issues

  1. Conflicting results with SMA, possibly due to way the wire was spinned together, to many wires absorbing load, or power supply.
  2. Troubleshooting problems with activating the gravity mechanic in Unity, getting to know unity’s physical game engine,

A plan for the next week of work

  1. Sink or swim
  2. Abort memory wire if conflicting results persist, pursuing alternative haptic responses
  3. Finish with the Unity integration, and look towards integrating leap motion.
  4. Develop the housing and other concepts into integration of the glove.

Sirena 4/4/17

This past week Emma was able to start 3D printing and get a better idea of how the design and tech could possibly all work together. The first print took about 3.5 hours and some challenges did arise. The first print didn’t actually end up working very well. The Simblee didn’t fit very well into the 3D printed case that was designed. Next steps include altering the sizing of the case and getting a better idea of whether the entire bracelet can be 3D printed or not. The idea behind them is that the simblee with the button attached at the top can slide right into the case, with the second circle piece resting right above the button. This way, when the user pushes down on the circle opening, there would be more surface area for the button to be pushed. With the next design, Emma is trying to get that hole turned into an indent similar to the iPhone home button concept.

Screenshot of print from TinkerCad

3-D printing in process

Keegan worked on cleaning up the Arduino code for the vibration motor and beginning the user interface used through the Simblee for mobile application.  He was able to integrate both codes into the same one. This means the vibration motor will be working correctly while the user interface of the app runs. Keegan has been able to communicate back and forth between the iPhone app and the Simblee and update aspects of the app, however this was through found code (www.instructables.com) and is not the exact function we want. The next step will be implementing the idea from the found code into the function we want to see.

As a group we were able to get together and start brainstorming on ideas to use in the app and what we would like to see in a finished product. Some ideas included; having four different pages with a home page, the SOS page, a Beacons page (your chosen contacts), and a chat page. We’re currently working on the exact things we want on each page but have some ideas. The photo below is from our brainstorm.


Back to the Drawing Board

  • Last week
    • After meeting with Rich in the printing room, I got re-inspired to work on my original design. I completed drawing the second version of the heel components and sent them to be printed. I’m glad that I know that there is a very affordable way to print the pieces, but the delivery timing is a bit unpredictable.
  • This week
    • I am going to attempt to construct a hybrid of my two designs and a suggestion that Kevin (student) had that would allow me to use a hydraulic movement rather than the rotary motor.

Unconventional Honesty Post 4

Last week, we focused on our jacket, which has been stripped down, and pockets are being sewn on. The jacket was a great find at only $7 from a thrift store! We have also started working with out neopixels, but we found out the the cables had been connected wrong! Andres sorted the issue by welding the correct cables on and we’re ready to continue testing them this week. We also had some difficulty with our coding of the neopixels, which was due to a bad connection with our Arduino.

For next week, we are going to continue our work on the coding, make the neopixels work, and attach the heart rate monitor. The jacket will be further prepped, and we will get organza by thursday to start attaching to the jacket.

EoS Week 4

Progress: Soldered wires to the OLED and got it displaying the correct readings from my new range finder module. I couldn’t show it in a video since I don’t have a way to connect the wires, I don’t have a wire cutter and didn’t want to ruin the wires and re-solder them again.

Problems: None so far, just need to solder and calculate my power needs.

This Week: I’m going to solder everything together on Tuesday, so I’ll attach the Arduino, OLED, and the range finder so that I can work on the lens and the battery needed. Hopefully I can get the right battery and charger circuit Tuesday as well, getting the wrong one and frying my circuits would be extremely unfortunate. Once I get the battery and charger I can finalize the housing which I can base off of the heads up display example from my first post.