Project Post 1

Project Title: EoS

Members: Konnor Beaulier

Description: I will be making wearable range finder glasses with a heads up display, so the user can determine the distance of an object and the distance will show on a lens in front of their eye.


A lot of the concept and inspiration came from: http://www.instructables.com/id/Arduino-Data-Glasses-for-My-Multimeter/

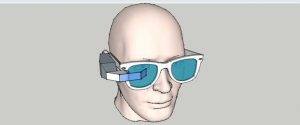
Where this man made arduino glasses for his multimeter with a heads up display. So even though I will be straying from his original plan and look, I will be using this as a base:

Here we can clearly see the heads up display as well as the casing for the circuitry. However, a big difference is that my range finder glasses will have the two lenses for the range finder module on the outside of the glasses, next to the lens of the heads up display.


Materials:

  • LRF (laser range finder) module, 100m distance: $47
  • Arduino pro micro chip: $9
  • Glass lens for the display: $6
  • OLED micro display: $15
  • Small plastic mirror: Depends on schematic
  • Battery: Only if needed
  • Charger circuit: Depends on total power needs

Timeline:

Week 1:

  • Order all of the supplies needed

Week 2:

  • Beginning assembling the prototype
  • Get a rough housing of the circuits created

Week 3:

  • To have the OLED display and the arduino displaying the correct results
  • If the LRF module arrives in time, get that coordinated as well
  • Start calculating the optics numbers needed

Week 4:

  • LRF shows correct distance and it is displayed in the OLED screen
  • Cut the lens to the sizes needed
  • Work on final housing

Week 5:

  • Assemble all the circuits with the optics, test to make sure it displays
  • Create final housing, 3D printing?

Week 6:

  • Testing and fine tuning
  • Improvements if needed


Fallback:

A big fallback would result if the actual device is too wide or too heavy to sit on one side of the glasses, which would result in me having to switch the LRF module to the other side of the glasses. Then my casing would have to loop behind the user’s head, connecting the microcontroller to the LRF and supporting the device and glasses as well. Another fallback would be if the LRF never comes due to shipping issues or if I can’t get it to work properly. In this case I’ll get a much shorter range module on sparkfun for about $15 just to get the initial outline of the project working. I’ll set the cutoff for all of this at the end of week 3/beginning of week 4 where I should have the LRF module and know how to use it.


Lauren’s Project

Project Title TBD

Project Team Members Me, Lauren

Project Description

Versatile, fashionable jacket that can be worn for casual streetwear or for athletic wear/running, biking, yoga, etc. Jacket will have smart textile technology that allows the fabric to go from looking normal during the day to a visible, glowing fabric at night.

Sketches/Concept Art

Materials and Costs

  • 90% polyester, 10% spandex or Neoprene
  • Mesh fabric
  • Sewing materials, flat patterns
  • LunaBrite light technology products
    • Eco-friendly, machine washable, adds visible glow without wires or batteries. Lunabrite recharges daily in sunlight or room light, emitting illuminating glow from dusk to dawn.

Timeline

3/1: prototype, sport jacket ordered

3/2: Lunabrite technology contacted and waiting to hear back.

3/7: Have prototype jacket in hand

3/21: finish prototype

3/23: begin final

Fallback Plans

If Lunabrite light technology becomes unaffordable or does not work out, I will use an arduino lillypad and battery for LEDs or el panel with a light sensor.

Haptic Glove First Project Post

Project Title

Haptic Glove

Project Team Members

Kevin, Qiuxuan

Project Description

We hope to create a glove that can be used to interact with objects in virtual reality. Most of the virtual reality products now are focusing on visual experiences, such as “VR Goggle”. However, it loses touch sensations, such as the feeling of gravity and interaction force. Touch sensation plays a significant role in maximizing people’s experience. Therefore, we want to create a VR glove that uses special wires which are sensitive to temperature change (contract 3%-5% when exposed to heat or electrical current) to mimic the feeling of touching and pressure, to provide more realistic and engaging experience to users.

Sketches/Concept Art


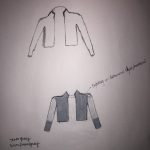
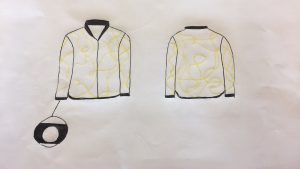
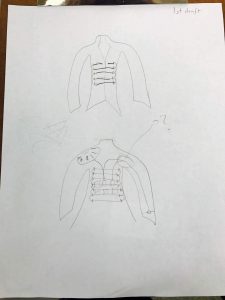
Connection\mounting type will be a looped conventional wire, or perforated actuator ribbon. Electrical connection will run in the gloves hemming for aesthetics and practicality.

Securing the Actuator wire is the most critical step currently. The force that the wire generates, varying between gauge, may burst the mounting, may stretch the underlying fabric so that there is not haptic feedback. Maintaining a fixed location on the glove to engage a haptic response may require 3D printed “splints,” to counteract the lateral forces generated. Elastic tension may be required to run along the nail side of the finger to give the additional guarantee of proper response.

Consideration on mounting site must account for the ~5% contraction, so that tread does not break upon Actuator activation.

We will use Unity to develop the programming and connect the microcontrollers with gloves, letting the sensors to communicate with the computer.

Materials and Costs

  1. FLEXINOL® Actuator Wire   estimated cost: $10-20
  2. Microcontrollers and USB    estimated cost: $40
  3. Glove                                      estimated cost: $10
  4. Wires                                      estimated cost: $10
  5. 3D-Printing Materials            estimated cost: $20

Timeline

March 6: Have all necessary materials.

March 12: Finish (3D printing model) and wire design.

March 15: Test

Milestone 1 (March 16): The technology for the project is shown to work

Spring Break

March 30: Programming and combine it with the glove

April 5: Test on program

Milestone 2 (April 6): The technology has been shown to work in a wearable configuration

April 13: Prepare for demo

Milestone 3 (April 20): The technology and final wearable are fully integrated

Fallback Plans

Ideally, we hope to use FLEXINOL® Actuator wires to provide haptic feedback. However, if it is not applicable, we can use other wires and shape into alternate forms to provide better feedback. Or we can use the wire to pull a spring/coil or elastic band to provide feedback. Or we can use tiny rumble motors or electrodes.

First Project Post

(Working) Project Title: Unconventional Honesty

Team Members: Andres Tapia, Fang Qin, Jade Palandech

Project Description: A jacket that will light up in specific patterns in reaction to changes in heart rate. The heart rate will be monitored by a pulse sensor in the cuff of the jacket.

Drawings:

Resting heart rate:

Slow heart rate:

Fast heart rate:

Updated (3/2/17) Sketches: 

Inspiration: We were inspired by the idea of creating a jacket that expresses the wearer’s heart rate as a form of unconventional honesty. We haven’t really seen any other jacket like this on the market.

Materials and Costs:


Heart rate monitor:                           $12

Jacket fabric and other materials : ~$60

5 Neopixel strip 60LED -1m:       3 x $25

Conductive thread 125yds:                 $6

5 Volts batteries:                                $14

3 Lilypads:                                     3x $14


Timeline:

March 16: Finalize design and map out wiring

April 4: Jacket is sewn and complete, begin wiring and test runs.

April 20: Jacket is fully functional!

Fallbacks:

Change pattern to be simpler and use less lights

Go down to one heart rate/design

Use LEDs instead of Neopixels

Possibly a different sensor


Emma & Keegan

Project Title: The Sirena 

Project Team Members: Emma Boykin and Keegan Moldenhauer

Project Description: Simply-we want to make a bracelet that promotes safety and comfort on college campuses.

However, in order for this bracelet to do its job it has to be worn and to be worn it has to look good. Hence why our goal is to create a discrete safety bracelet that looks like an ordinary piece of jewelry that can be worn from the day going into the night. Once a specific button is pushed for a specific distress situation, the wearer of the bracelet will see a part of the bracelet light up letting them know that someone is coming to help


Sketches/Concept Art:

Materials and Costs:

  • Microcontroller-https://tinyurl.com/j3mkl2x
  • Bluetooth-Mate Silver w/ chapter 9 being helpful
  • Wiring
  • LED-Potentially 1 for notification
  • Vibration motor-for notification
  • Leather-for prototype
    • Possible wiring to be placed inside leather so it can be adjustable


Timeline:

  • Milestone 1 (March 16)
    • Bluetooth working to receiver
  • Milestone 2 (April 6)
    • Tech working sized down to wearable size-app working
  • Milestone 3 (April 20)
    • Tech and final design integrated
    • Fallback Plans: Scrap bluetooth entirely and just use sound or use basic app interface